
Getting your electric vehicle charger set up doesn’t have to be a hassle. With a bit of patience and a few handy tools, you can get it done. Here’s a simple guide that breaks down the Electric Vehicle Charger Installation process into easy steps.
1. Gather Your Tools: Before diving in, make sure you have everything you need:
2. Find the Right Spot: Choose a location for your charger. Ideally, it should be close to where you park your vehicle. Measure the distance to ensure it reaches your car without any issues.
3. Install the Mounting Bracket: Use your stud finder to locate wall studs. Mark the spots and secure the mounting bracket to the wall with screws. Make sure it’s level!
4. Connect Wiring: If your charger requires hardwiring, this is where you might need an electrician. But many chargers are plug-in models that just need a proper outlet. Follow the manufacturer’s instructions and make sure everything is safe and secure.
5. Test It Out: Once everything is in place, plug in your electric vehicle and start charging! Give it a try to ensure everything is working smoothly. You’re all set to hit the road!
Choosing the Right Charger for Your Needs
Choosing the right charger for your electric vehicle is super important. You want something that fits your lifestyle and will get you back on the road as quickly as possible. First, think about your daily routine. If you drive a lot, you might want a Level 2 charger. These chargers juice up your car much faster than standard ones, so you won't have to wait around. If you're a casual driver, a Level 1 charger might do the trick. It's easy to use and can plug right into a regular outlet.
Next up, consider where you'll be installing the charger. If you have a garage, that’s a great spot for a permanent setup. But if you're going for an outdoor installation, make sure to pick a charger that can handle the weather. There are plenty of options out there designed for outdoor use, so you won’t have to worry about rain or snow damaging your equipment.
Don’t forget about compatibility! Make sure whatever charger you choose works with your specific vehicle model. Most newer EVs are pretty flexible, but it’s still a good idea to double-check. Some chargers even come with adjustable settings to cater to different car brands.
Finally, think about your home’s electrical system. If you’re considering a Level 2 charger, you might need an upgrade to your electrical panel. This is where a pro comes in handy. They can help with the Electric Vehicle Charger Installation and make sure everything is up to code. This way, you won’t have to stress about any technical issues down the line.
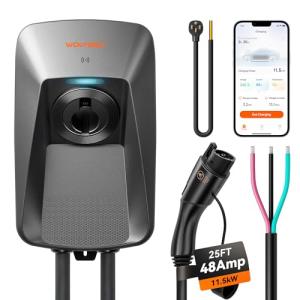
WOLFBOX Level 2 EV Charger with 25ft Cable
Charge your electric vehicle quickly and conveniently with a long cable for easy access
Product information
$439.99
Product Review Score
4.77 out of 5 stars
225 reviewsProduct links
Tips for a Smooth Installation Process
Getting your electric vehicle charger installed doesn’t have to be a hassle. A little preparation can go a long way in making the process smooth and stress-free. Here are some helpful tips to keep in mind during your Electric Vehicle Charger Installation.
First off, know your electrical setup. Check your home’s electrical panel and ensure it meets the requirements for the charger you’ve chosen. Some chargers need a dedicated circuit, so knowing what you have can save you time and potential headaches.
Next, pick the right location for your charger. Ideally, it should be close to where you park your car. Make sure there’s enough space for easy access. If you have a garage, that’s usually the best spot. Just keep in mind that it needs to be within reach of your car's charging port.
Don’t forget about local codes and permits! Many areas have specific rules regarding Electric Vehicle Charger Installation. It’s worth checking in with your local authorities or an electrician to ensure you follow all the necessary guidelines. This way, you avoid any fines and ensure the installation is safe.
Lastly, consider hiring a professional if you’re unsure about any aspect of the installation. While some chargers are user-friendly, it's best to get help for anything involving wiring or the electrical system. It’ll give you peace of mind knowing everything’s done right, and you can start charging your ride with confidence.

Portable Level 2 EV Charger with 23 Ft Cable
Charge your electric vehicle quickly and conveniently at home or on the go
Product information
Product Review Score
4.8 out of 5 stars
232 reviewsProduct links
What to Expect During Installation Day
When you finally decide to take the plunge and get your electric vehicle charger installed, it’s normal to feel a mix of excitement and a little bit of anxiety. What’s installation day really like? Here’s an easy breakdown to help you know what to expect.
First off, the installer will arrive and assess your space. They'll usually check your electrical panel and the spot where you want the charger. It’s a good time to ask any questions you have about the setup. They’ll talk you through where the charger will go and how everything works.
Next, the actual installation process kicks off. It might involve some drilling and running wires, but don't worry! Most installers work quickly and cleanly. Expect to be in and out in just a few hours, depending on your home’s setup and the type of charger you’re getting. If you picked a hardwired model, the installer will ensure everything is secure and follows safety codes.
After they’ve finished, the installer will test the charger to make sure it's working perfectly. They’ll show you how to use it and answer any last-minute questions you might have. Once that’s done, you’ll be ready to plug in and charge your electric vehicle. It's that simple!
So, on installation day, just kick back and let the pros handle it. With a little preparation, you’ll be charging your car in no time, making your electric vehicle charger installation a breeze!


