
Picking the right charger can feel overwhelming, but it doesn’t have to be. Start by thinking about your specific needs and how you plan to use your electric vehicle. Do you mostly drive short distances, or do you take longer trips? Understanding your driving habits helps you choose a charger that fits your lifestyle.
Next, consider the charging speed. There are different levels of chargers: Level 1, Level 2, and DC fast chargers. Level 1 chargers are great for overnight charging at home, while Level 2 chargers give you a quicker boost for daily driving. If you need fast charging, a DC fast charger might be the way to go, but they’re usually more suited for public charging stations.
Don’t forget about compatibility! Ensure that the charger you choose works with your vehicle. Most electric vehicles use J1772 connectors for Level 1 and Level 2 charging, but some might require special adapters. Double-check what your car needs before you buy.
Also, think about installation. Some chargers are easier to set up than others. Electric Vehicle Charger Installation can be a DIY project for those who are handy, but hiring a professional is often the safest bet. Make sure to account for any electrical upgrades your home may need for the charger.
Finally, look at the features. Some chargers offer smart technology, letting you control charging through an app on your phone. Others might come with extra safety features, like overcurrent protection or weather resistance. Choose the one that feels just right for you, and you’ll be set to enjoy the convenience of charging your electric vehicle at home!
Essential Tools for Installation
When you’re diving into Electric Vehicle Charger Installation, having the right tools makes everything smoother and way less stressful. Let’s check out the essentials you should have on hand before you start.
First off, you’ll need a drill. A good power drill helps you make clean holes for anchoring the charger to the wall or post. Get the right bit sizes for the job, and you’ll be breezing through the installation like a pro.
Don’t forget your wire strippers. They’re key for preparing electrical connections safely. You want nice, clean wire ends to ensure a solid connection, and this tool helps you avoid any frustration down the line.
Other handy items include a level to make sure everything is mounted perfectly straight. A measuring tape is also crucial for getting those distances right before you drill. Plus, having a screwdriver set will have you covered no matter what types of screws come with your charger.
Finally, keep a voltage tester in your toolbox. It’s an essential safety tool that checks for live wires before you get to work. You can never be too safe when dealing with electricity, right? With these tools in your corner, your Electric Vehicle Charger Installation will be an easier, smoother process!
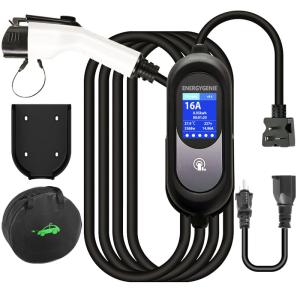
Portable Level 1 & 2 EV Charger with 17FT Cable
Charge your electric vehicle at home or on the go with this versatile and convenient 17-foot cable
Product information
$109.99
Product Review Score
4.51 out of 5 stars
194 reviewsProduct links
Step by Step Charger Setup
Getting your charger up and running isn’t as tough as it seems. With a bit of planning and a few simple steps, you’ll have your electric vehicle charger installed in no time. Here’s a friendly guide to make your electric vehicle charger installation as smooth as possible.
First things first, choose a location for your charger. Look for a spot close to your parking area, ideally near an outlet. You’ll want to avoid extension cords if possible, so pick a place that makes sense. Think about the distance from your power source and any potential obstacles that could get in the way. A garage or carport is often the best choice for convenience and protection from the elements.
Next, gather your tools. You’ll typically need a drill, screws, a level, and possibly some electrical wire, depending on the type of charger you’ve purchased. If your charger requires hardwiring, consider getting an electrician to help out. It’s important to follow the manufacturer’s instructions for electric vehicle charger installation closely, so keep that manual handy.
Once you have everything gathered, it’s time to get everything connected. Start by securing the mounting bracket to the wall, using the level to ensure it’s straight. After that, attach the charger to the bracket. If you’re doing any wiring, double-check your connections and make sure everything is safe and secure. Finally, plug it in and power it up!
After installation, test it out with your vehicle. Make sure it works properly before you call it a day. If everything checks out, you’re all set to enjoy the convenience of charging at home!
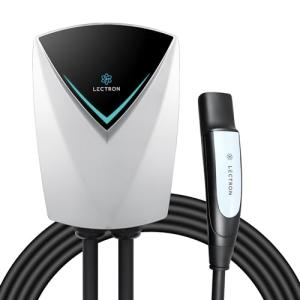
Lectron Tesla V-Box Pro 48 Amp Level 2 Charger
Charge your Tesla quickly and efficiently with this powerful and user-friendly Level 2 charger
Product information
$369.99 $329.99
Product Review Score
4.22 out of 5 stars
134 reviewsProduct links
Troubleshooting Common Installation Issues
Installing an electric vehicle charger can sometimes come with a few bumps in the road. Don't worry; we can fix that! Here are some common issues you might face during your electric vehicle charger installation and how to tackle them.
First, let’s talk about power issues. If the charger doesn’t seem to be turning on, check the circuit breaker. It might have tripped due to a power surge. Flip it back on and see if that does the trick. If that doesn’t work, make sure your charger is getting enough power from your electrical panel. It might need a dedicated circuit, especially for higher-powered chargers.
Next up, if you’re running into trouble with mounting your charger, take a breath. Ensure you’re using the right tools and hardware. Many chargers come with mounting kits, but if yours didn’t, standard wall anchors and screws can do the job. It’s also crucial to make sure you’re installing the charger at the right height for easy access.
Lastly, let’s not forget about the Wi-Fi connection if your charger has smart features. If you're having trouble connecting, check your home network. Make sure your Wi-Fi is strong where the charger is located. Sometimes it helps to reboot your router. And remember, some chargers might need a firmware update straight out of the box, so check the manufacturer's instructions!


