
Getting ready for your EV Charger Home Installation is easier than you might think! First, figure out where you want to install your charger. Look for a spot near your parking area, ideally close to your electrical panel. This will make things simpler and more efficient.
Next, check your electrical system. You might need to upgrade your panel or wiring to handle the charger safely. It’s smart to hire a qualified electrician for this part. They can tell you what you need and help keep everything up to code.
Don’t forget about the charger itself! You have a few options to choose from. Think about the charging speed you need and how often you’ll be using it. Some chargers offer faster charging times, which might be worth considering if you’re always on the go.
Lastly, get yourself some tools! You might need a wrench, screwdriver, and a drill, depending on your charger’s installation instructions. Having the right tools makes everything smoother when it comes to your EV Charger Home Installation.
Finding the Right Location
Choosing the right spot for your EV Charger Home Installation can make a big difference in convenience and efficiency. Start by looking for a location that’s close to where you park your electric vehicle. Think about your garage or driveway since these areas often offer the easiest access to power sources.
Consider the location of your electrical panel too. The closer the charger is to the panel, the simpler the installation will be. This can save you both time and money. If your electrical panel isn’t nearby, you might need some extra wiring done, which can raise the overall cost of your installation.
Next, think about your daily routine. If you typically charge your vehicle overnight, make sure the charger is in a spot that’s safe and easy to reach in the dark. Good lighting can help, but also consider potential hazards like water or low-hanging branches. You want a hassle-free charging experience.
Lastly, don’t forget about ventilation. If you’re installing a charger in a garage, ensure there’s enough airflow. This keeps everything cool and helps your equipment last longer. All of these factors contribute to a smooth EV Charger Home Installation, so take your time and pick the best spot for your needs.
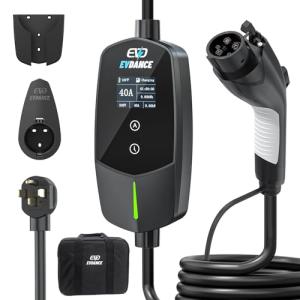
EVDANCE 40Amp Level 2 Portable EV Charger
Power up your electric vehicle quickly and easily with this compact and versatile charger
Product information
$209.99
Product Review Score
4.78 out of 5 stars
210 reviewsProduct links
Wiring Basics You Should Know
When you're thinking about EV Charger Home Installation, getting the wiring right is crucial. Let’s break down the basics so you can feel confident as you set things up. First off, know your home’s electrical capacity. Most homes can handle a standard Level 2 charger, but it’s a good idea to check your circuit breaker panel. If you’re unsure, calling in a pro can save you headaches later.
Next, consider what type of wiring you’ll need. AWG (American Wire Gauge) is your best friend here. For Level 2 chargers, you typically need 6 or 8 AWG wire, depending on how much power you plan to pull. Thicker wire handles the current better, which means quicker charging times. Remember that getting this part right helps your EV charger work safely and efficiently.
Don’t forget about GFCI protection. It’s a safety feature that protects against ground faults, which might happen if water ever gets in. Your local codes often require GFCI for outdoor installations, so check local regulations to stay compliant. Installing a dedicated circuit for your charger is also smart. This means it won’t share power with other devices, keeping things running smoothly.
Lastly, make sure you have the right tools and materials lined up before starting. A basic installation kit usually includes things like conduit, connectors, and of course, your wiring. If you run into any doubts or complications, it’s always a good idea to consult with a qualified electrician to ensure everything’s up to code. A little prep goes a long way in making your EV Charger Home Installation smooth and hassle-free!
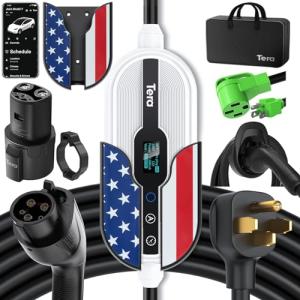
Tera Tesla Level 1 & 2 Portable EV Charger
Charge your Tesla anywhere with this versatile and easy-to-use portable EV charger
Product information
$222.75 $193.54
Product Review Score
4.41 out of 5 stars
162 reviewsProduct links
Final Steps to Power it Up
Alright, you’ve made it to the final steps of your EV Charger Home Installation! Exciting stuff! Before you can plug in and start charging, let’s wrap up everything you need.
First up, check your connections. Ensure all wires are snugly connected and everything is in place. A quick inspection can save you from issues down the road. Think of it as giving your setup a little TLC.
Next, it’s time to power on the charger. Flip that switch and watch it light up! Don’t freak out if it takes a moment to start. Sometimes these devices just need a second to wake up. Once it's all lit up, you’re in the clear!
Finally, do a test charge. Plug your EV in and see if it starts charging. Grab a cup of coffee and chill out for a bit while your ride gets some juice. If everything's working fine, you’re all set for your first full charge! Enjoy the freedom of charging at home.


