
Choosing the right EV charger for your home is super important. You want something that fits your needs and makes charging your electric vehicle a breeze. First off, think about the power level. Most home chargers come in Level 1 or Level 2 options. Level 1 chargers plug into a standard outlet, which is great for overnight charging if you don’t drive much. But if you have a longer commute, a Level 2 charger is way faster and can get your vehicle ready in just a few hours.
Next, consider the connector type. Most electric vehicles use either a J1772 connector or a Tesla connector. If you have a Tesla, you'll need a specific charger, but many universal chargers work for other brands. Make sure the charger you pick is compatible with your vehicle. You don't want any surprises when it's time to plug in.
Another important factor is your home’s electrical capacity. Check your home’s electrical panel to see if it can handle the additional load from an EV charger. If you’re unsure, a licensed electrician can help you assess and upgrade your system if needed. This is a key step in your EV Charger Home Installation process, so don’t skip it.
Finally, think about the features you want. Some chargers come with smart technology that allows you to schedule charging times or monitor your energy usage through an app. This can help you charge during off-peak hours, potentially saving you money. Look for a unit that fits your lifestyle and budget to make your charging experience as seamless as possible.
Preparing Your Home for Charger Installation
Getting ready for your EV charger home installation is a big task, but it doesn't have to be overwhelming. A little prep work goes a long way to make sure everything goes smoothly. Let’s break down what you need to consider.
First, check where you want the charger to go. Think about the location of your parking spot and how far the charger needs to run from your home’s electrical panel. It’s smart to pick a spot that makes charging easy. A close location means less hassle with wiring and makes it more convenient for you.
Next, inspect your electrical system. Make sure your home can handle the additional power needs of the EV charger. If you’re unsure, it’s worth calling an electrician to assess your setup. They can help figure out if you need any upgrades to your electrical panel or circuit. You don’t want to start the installation and find out your system isn’t ready.
Lastly, clear the area around where you plan to install the charger. This makes it easier for the installation team to work. Move any furniture, vehicles, or items that might get in the way. The smoother the installation process, the quicker you’ll be charging up and hitting the road!
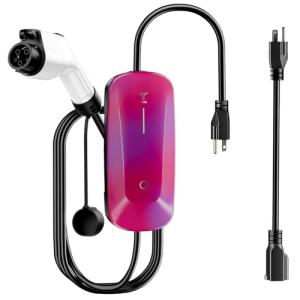
Portable Level 1 & 2 EV Charger with 23Ft Cable
Charge your electric vehicle anywhere with ease using this versatile and convenient portable EV charger
Product information
$89.99 $80.99
Product Review Score
4.47 out of 5 stars
98 reviewsProduct links
Step by Step Installation Process
Getting your EV charger set up can feel a bit daunting, but don’t worry! This step-by-step installation process will make EV Charger Home Installation a breeze.
First things first, pick the right location for your charger. You want it close to your parking spot but still away from any potential hazards. Make sure there’s easy access to your electrical panel, too. Once you’ve mapped out where the charger will go, it’s a good idea to check if you need any permits. Some areas require a permit for home electrical upgrades, so better safe than sorry!
Next, gather your tools and materials. You’ll need a few basic tools like a drill, screwdrivers, and pliers. Don’t forget the actual EV charger, of course! Depending on your electrical setup, you might need some additional wiring and connectors. If you’re unsure about what to get, check the charger’s manual or ask the retailer.
Now comes the fun part—wiring everything up! If you're comfortable working with electricity, turn off the power at the breaker and connect the charger following the instructions in the manual. Usually, it involves connecting a few wires to your home electrical circuit. If wiring isn’t your thing, this is where you might want to call in a pro to make sure everything’s safe and compliant. You can relax knowing your car will get charged without any hassle.
Once everything is hooked up, take a moment to test the charger. Flip the power back on and see if it works as expected. Plug in your car and watch it start charging! And there you have it—your EV Charger Home Installation is complete. Now you can enjoy the convenience of charging your vehicle right at home. Simple, right?
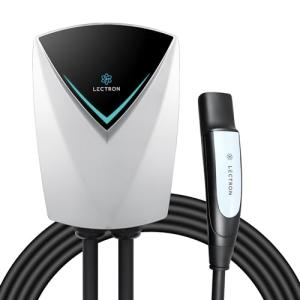
Lectron Tesla V-Box Pro 48 Amp Level 2 Charger
Charge your Tesla quickly and efficiently with this powerful and user-friendly Level 2 charger
Product information
$369.99 $329.99
Product Review Score
4.22 out of 5 stars
134 reviewsProduct links
Maintaining Your Home EV Charger Efficiently
Keeping your EV charger in tip-top shape doesn’t have to be complicated. After your EV charger home installation, proper maintenance ensures it works efficiently and lasts longer. Here are some easy tips to keep in mind.
First off, regularly inspect the charger for any signs of wear or damage. Check the cables, connectors, and any exposed wiring. If you notice any fraying or cracking, it might be time to get them checked out. Keeping everything clean is also key. Dust and dirt can accumulate and affect performance. A simple wipe-down every now and then keeps everything tidy.
Next, pay attention to the charging port on your EV. Make sure it’s free from debris as well. A blocked port can slow down charging or even lead to issues over time. If you see any dirt, a quick clean will do the trick.
It’s also smart to keep an eye on the software. Some chargers come with apps to help monitor performance. Make sure your charger’s firmware is up-to-date for the best experience. You’ll benefit from any new features, and it can improve charging efficiency.
Lastly, keep all your documentation handy. Having manuals or warranties close by will save you time if you run into any issues. Knowing your charger inside and out can help you troubleshoot common problems quickly. With just a little TLC, your EV charger home installation can serve you well for years!


